How to Claim Your Delayed Refund ITR Online via the Re-Issue Portal
Waiting for your money? Learn how to claim your delayed refund ITR online through the Income Tax Department's re-issue portal with our expert guide.
Waiting for a tax refund can be stressful, especially when the status on the portal shows that the payment has failed. If you have been refreshing your bank account repeatedly without any luck, you aren’t alone. Many taxpayers face hurdles during the final stages of receiving their refund itr due to technical glitches or incorrect bank details. At CA4Filings, we understand that tax compliance is a journey, and our Income Tax Return Filing services are designed to ensure your entire process—from initial filing to final reconciliation—is handled with precision.
When your refund itr doesn't arrive as expected, it is often due to a failed refund scenario. The Income Tax Department attempts to credit the amount to your pre-validated bank account. However, if the account is closed, frozen, or the details don't match, the process hits a wall. Don't worry; the government has streamlined this by introducing the refund re-issue request feature.
Why Does a Refund ITR Get Delayed?
Before we jump into the technical steps, let’s talk about the "why." Understanding the root cause of a failed refund can help you avoid it next time.
Bank Account Validation Issues: This is the most common culprit. If your bank account isn't pre-validated on the e-filing portal, the system cannot process the transfer.
Mismatched Records: Sometimes, the name in your bank account doesn't perfectly match the name on your PAN card.
Inactive Accounts: If the account provided is dormant or inactive, the NEFT/ECS transfer will inevitably bounce.
System Errors: Occasionally, technical outages at the CPC (Centralized Processing Centre) can cause a delay in the income tax return refund process.
How to Check Your Refund Status
Before initiating a re-issue, always double-check the current status of your refund itr.
Log in to the Income Tax e-filing portal.
Navigate to the "e-File" tab.
Click on "Income Tax Returns" and then "View Filed Returns."
Check the status. If it says "Refund Failed" or "Refund Returned," it’s time to take action.
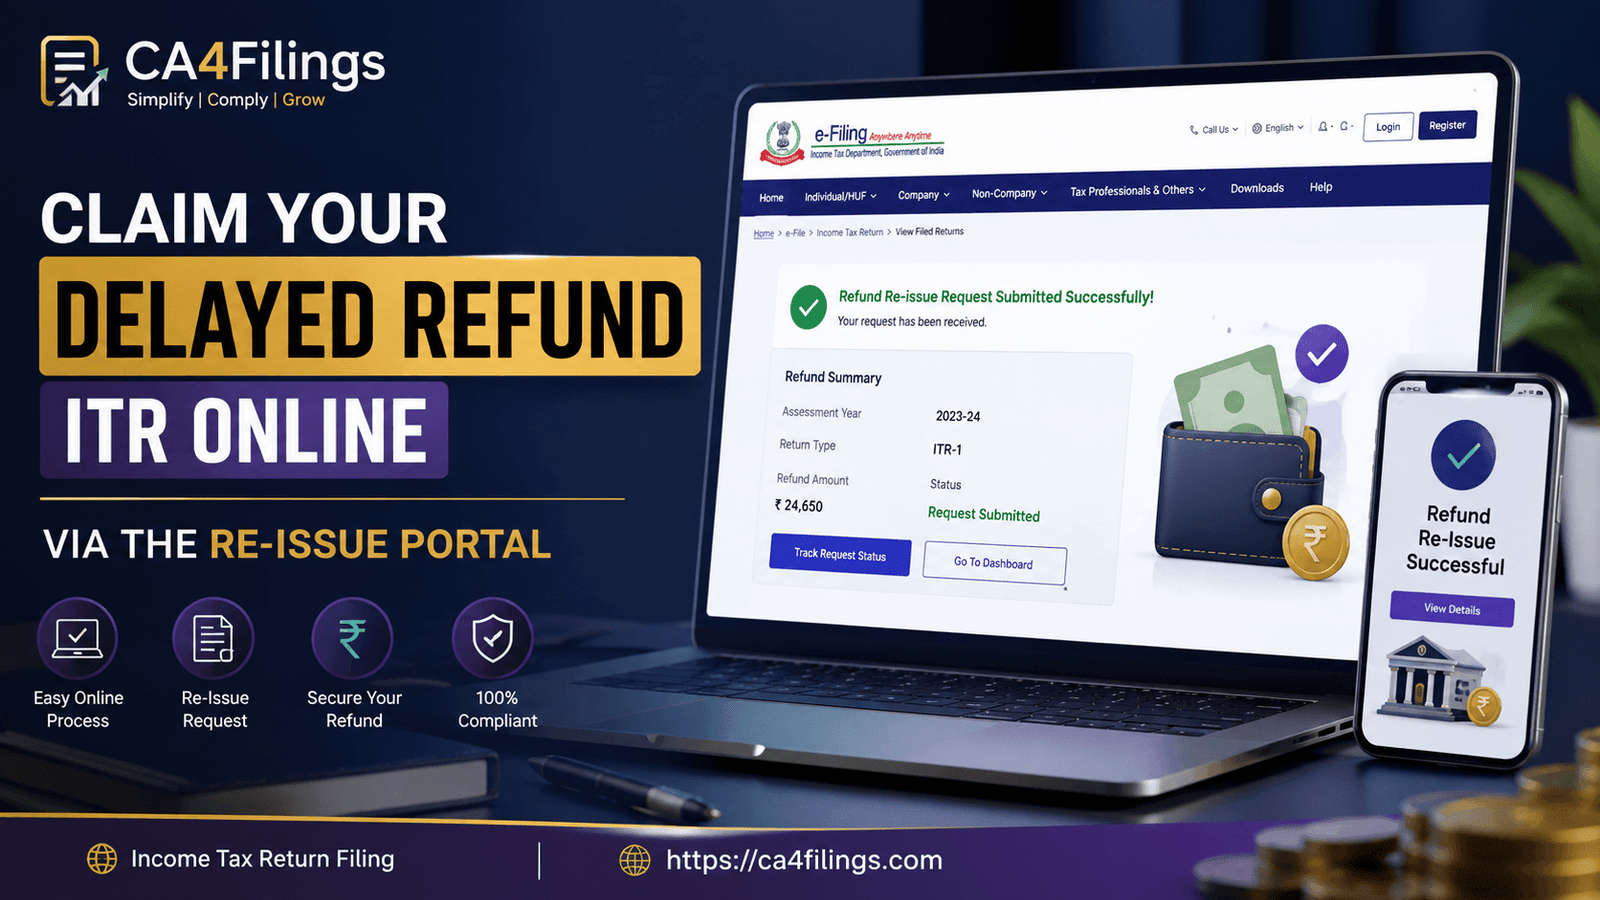
Step-by-Step Guide: Initiating a Refund Re-issue Request
If you have confirmed a failure, you need to use the refund re-issue request facility on the portal. Follow these steps carefully:
Step 1: Login and Navigate
Once you are logged into your dashboard, go to the "Services" tab. Select "Refund Re-issue." This will take you to a dedicated window for managing failed credits.
Step 2: Create Request
Click on "Create Refund Re-issue Request." You will see a list of your filed returns. Identify the specific assessment year for which the refund itr failed.
Step 3: Select Bank Account
This is the most critical part. Ensure you select a bank account that is currently active and, most importantly, pre-validated. If you haven't validated a new account yet, do it first. Ensure your PAN is linked to the bank account and your KYC is up to date.
Step 4: Verification
Submit the request using an OTP-based e-Verification (Aadhaar OTP) or EVC. Once submitted, the system will process your request, and you will receive a transaction ID for your refund re-issue request.
Expert Tips from CA4Filings
As practitioners, we often see clients make small mistakes that lead to huge delays. Here is our advice to ensure your income tax return refund arrives without a hitch:
Always Pre-validate: Do not wait for a refund to be issued to validate your bank account. Make it a practice to validate your primary account immediately after filing your return.
Keep Contact Details Updated: Ensure your mobile number and email ID in the e-filing portal match your bank records.
Don't Panic: If a refund fails, the money does not disappear. It remains with the Income Tax Department's escrow account until you raise a request to have it sent to a valid account.
Frequently Asked Questions (FAQs)
What happens if I don't raise a refund re-issue request?
If you do not initiate the refund re-issue request, the refund amount will remain in the government’s account. It will not be credited automatically until you provide the correct details.
How long does it take to receive the refund after the request?
Generally, once a re-issue request is processed, it takes approximately 15 to 30 days for the credit to appear in your bank account, depending on the speed of the bank.
Can I change my bank account for the refund?
Yes, the re-issue portal allows you to select any pre-validated bank account linked to your PAN. It does not necessarily have to be the same account you used at the time of original filing.
Is there any fee for raising a refund re-issue request?
No, the government does not charge any fee for raising a request through the e-filing portal. If you encounter any "e-filing support" websites asking for a fee, please be cautious of potential phishing.
What if I am still facing a "Failed" status after re-issue?
If you have already raised a request and it fails again, you should raise a grievance on the "e-Nivaran" tab or seek assistance from a professional to review your PAN-bank linkage.
Managing your finances involves more than just paying taxes; it involves ensuring that your hard-earned money, when owed back to you, reaches your account safely. Dealing with a failed refund can be frustrating, but by using the refund re-issue request facility correctly, you can get your refund itr back on track.
At CA4Filings, we strive to simplify complex tax procedures for our clients. Whether you are dealing with a stuck refund or need assistance with tax planning for the upcoming year, our team is here to support you. Don't let bureaucratic hurdles hold your money back. Reach out to us today for expert tax assistance and let us handle the complexities while you focus on your business and personal growth.
Latest Updates
ca4filings.com Services


-registration.png)